DIY Project 7
Refurbishing toggle switches
by Jean Caron, Vintage Roadster Restoration, Winnipeg, Manitoba
Here I will detail how to refurbish a toggle switch.
As part of a comprehensive restoration, these small items sometimes tend to be overlooked and should not be in order to provide years of good service. There are many types of toggle switches and some models of postwar British cars often carry a large number of them. For the purpose of this article, one will assume that the toggle switches have been tested and are in working condition prior to refurbishing them.
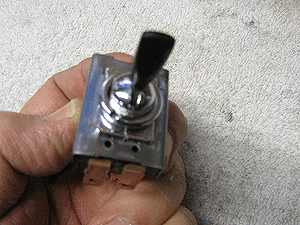
The switch here is an original Lucas six prong, part #31837E, date coded 10/65, which means it likely came with the car, when new, since it is fitted to a 1965 Austin-Healey BJ8. This particular unit serves the headlights and taillights and is part of a cluster of four toggle switches that are located on the centre part of the dashboard.


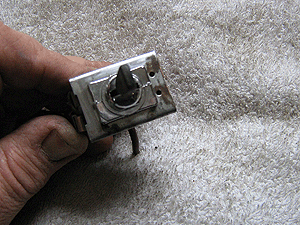
As can be seen on the above photos, the terminals are covered in verdigris and are in need of cleaning to ensure proper continuity. The bakelite box also needs some cleaning and the switch lever handle appears to be turning white from age and overexposure to the sun, while the front metal housing shows surface rust is becoming quite prevalent.
Materials:300-400 grit emery or sandpaper, Mean Green cleaner or Windex, cotton swabs, air compressor with sharp nozzle, clear lacquer, masking tape,WD40, PC 7 (a two part epoxy), 3M grey Scotch Brite, turpentine, and black spray paint.
STEP 1: I start by cleaning the back of the switch by running an emery cloth or fine sandpaper (360 grit or higher) over all the terminals that are protruding from the back. Once this is done, I then check the bakelite housing for cracks and, if some are found, it is likely time for replacement of the switch. If not, as in this case here, I thoroughly clean the bakelite with a biodegradable solution Mean Green; that removes layers of dust, grease etc. quite easily. I then clean it with compressed air to remove any possible residue left in out-of-the-way places.
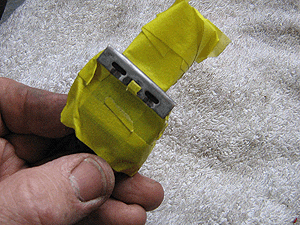
STEP 2: I then turn my attention to the front of the switch and start with the metal housing, by sanding it with 360 grit sandpaper to remove the surface rust. While this part of the switch is not seen anywhere on the dashboard, it is nevertheless imperative that it is thoroughly cleaned so as to prevent further rusting that could eventually prevent the switch to function properly. See photo with half of it already sanded.And the next photo after the sanding is complete as I mask the entire switch and apply two coats of clear paint on the metal surface.
Once the clear paint has dried, usually after a couple of hours, I then remove the masking tape and clean the threads of the front part of the switch. I first remove the chrome ring and the wavy ring that normally secure the switch to the dashboard. Often those threads have dirt or glue residue from the upholstery and various other matters that often clog the ring, making it difficult to secure it properly so that the switch holds tight to the face of the dashboard. I use WD40 for this, sprayed on a brass brush and then dry it with a rag.
STEP 3: The last item on this switch to be looked at now is the lever handle. In this case, the plastic handle shows a couple surface cracks, but neither are deep enough to allow the handle to come off or show that it is loose on the metal lever. Should these cracks be deep enough that the handle becomes loose, they would then need to be cut in a ;V ; shape and filled with PC-7, a two-part epoxy that is compatible with plastic and bakelite.
Some of the readers here may question why one would repair this when a new switch currently sells for just under $30.00 US. My answer to this is that yes, you can buy a new switch, likely not made by Lucas, very likely made in either China or India. It is also doubtful the handle will be an exact replica in size or in looks of the one you currently are repairing and it will not be code dated as this one is. I realize that to some these details do not matter, but to others it may, so it is a matter of personal preference.
So let’s continue here on the repairs of the handle. I sand it with a Grey 3M Scotch Brite scratchpad that leaves a minimum of visible lines on the plastic surface. Once this is done, I mask all areas not to be painted (see fifth photo below), clean the surface with turpentine, dry it well and ensure there are no dust particles sticking to the plastic; then I apply two coats of black paint. And finally, here is the finished product (right hand photo), ready for installation.